BannerFans.com
Showing posts with label apartment therapy. Show all posts

Wednesday, May 25, 2011

{Stencils: Love 'Em!}

It's no secret that I love the hell out of wallpaper...but it's also no secret that wallpaper can cost a pretty penny (over $300/ roll at Farrow and Ball). As of late, I've seen designers doing amazing things with stencils, and I thought I'd share some of my favourites. Now, if the word "stencil" has you shuddering, with visions of Jemima Puddle Ducks and grape leaves flashing hideously in your mind, fear not! These new stencils will certainly impress.

One of the best sources for stencils has to be Royal Design Studio. I can hardly believe these are actually stencils...they look so perfect!


I am also loving the idea of using these unconventionally to inject a little more detail in unexpected places.


What an awesome way to give new life a vintage piece of furniture. This would work well on bathroom cupboards and armoires as well!
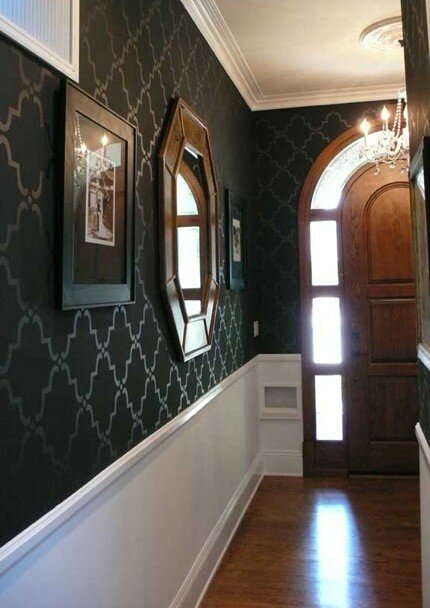

I love this Moroccan trellis pattern so much! What a perfect way to add richness and detail to the space. I think the effect would be equally effective below the chair rail in the right circumstances.


A stenciled design would freshen up any concrete floor. I think it would look right at home in a solarium, on a covered concrete patio or in a basement.

What about experimenting with a stencil design as a piece of art?


I absolutely ADORE the use of stencils here to add interest to the rise of these stairs. They look gorgeous!

As everyone knows the worst thing about wallpaper is trying to remove it after it's been up for years. The best part about these stencils? When you're sick of them, you just paint over them. Easy peasy!

On a side note, Steve and I are going to see a house in the West end tomorrow that we're VERY excited about. Wish us luck! I'll let you know how it goes!

Monday, May 23, 2011

Che Sera, Sera...

One of my favourite bloggers, Nicole from Making it Lovely has generously created this gorgeous printable art. How CUTE would it be in a playroom, or a little girl's bedroom? I love it!


Print it out on some heavy card stock and frame it up in a simple white frame for a beautiful effect. Here's how it looks in her daughter's bedroom:


Download your own here and enjoy!

Monday, May 16, 2011

Bunting Love!

Admittedly this post is probably about two years late, but can I just say that I adore these little pennant buntings that seem to be popping up everywhere? As the weather warms up and S and I begin the process of shopping for our first *family* home together, I have visions of outdoor tea parties and backyard barbecues adorned with these little pretties...Not to mention nurseries, children's birthday parties, weddings...not that I'm getting ahead of myself. I'd never do a thing like that ;)


This bunting from Mon Petit Amour is just adorable on display in a little girl's room.


Buntings like this one from Joy's Hope are available all over my favourite place to shop: Etsy


This bunting from Design Sponge would be a cinch to make, and it looks perfect. What a great way to decorate a cake if you lack icing skills (as I do)!


Imagine adorning a lovely layer cake with a bunting like this one made of stamps available at d.Sharp. What a great way to reuse post marked stamps. I was basically obsessed with the process of soaking stamps off of envelopes as a child...find out how here.


This picture is one of an Alice in Wonderland-inspired series taken by Rileigh ofBlue Satin Sashes. Coincidently, it's one of my favourite blogs ;)


Find a tutorial for this bunting-adorned pendant at You Had Me at Bonjour. It's a cute way to incorporate a bunting in a different way. It's a neat idea for a "custom light fixture" on the cheap!

Wednesday, February 2, 2011

Dining Room To Be...

I basically have my entire future house planned out in my mind, which all of my home-owner/home shopping friends have told me can lead to nothing but disappointment...But honestly? I can't help myself! I see gorgeous pieces and I instinctively imagine how they would look in their "ideal setting" (aka my house...Natch.)

This board is a very rough sketch of what I have bouncing around in my head with regards to my future dining room...


The Breakdown:

The wall colour is Coventry Grey by Benjamin Moore. We have this colour in our present space, and I absolutely adore it...so I think I'll stick with the tried and true in this case.

The wallpaper here is from Target, and it's been discontinued...it's not ideal anyways. I am sure we'll wind up with wallpaper from Romo Designs. I just can't get enough of them!

The gorgeous Edison Chandelier from the Pottery Barn is a true show-stopper. I love it's Industrial Chic-vibe...a little nod to my husband's engineering roots.

The grey upholstered Cody Chairs from West Elm will sit at either end of the table to balance the vintage chairs we purchased mid-month, which I will be reupholstering (in the same-ish fabric as the Cody chair) and spraying (cream or white...) when I have spare moment.

The Angle Leg Table is in the cards for the next couple of weeks. It's expandable with self-contained leaves. It's the perfect piece to really grow with us. Our initial idea was to go Ikea and just trash it when we buy, but why waste $200+?

The drapes shown here are Pottery Barn velvet blinds, but I'd definitely go with the Thai Silk drapery from Restoration Hardware if we were talking our forever home.

The Madison Distressed Convex Mirror from Restoration Hardware makes my heart happy...but the $675 price tag leaves me with visions of a diy tutorial to come.

I already own the Glamour Clock and it's one of my favourite pieces. I think it would fit perfectly in my dining room for a bit of sparkle and polish.

Well...I guess I'll just continue to patiently wait for "Snowmageddon"...here`s hoping for a snow day tomorrow!

Tuesday, February 1, 2011

Easy-Peasy Art Project...


This art project is perfect for pulling a room together. It's inexpensive, AND it's easy...double bonus!!

All you need to complete this project is:

-Two canvases in the size of your choice
-Three or four paint colours that coordinate with your space (try picking from a fabric or bedspread in the space for a super-easy palette...you can also "layer" colours for more depth by picking different shades in the same family) Buy $3 test pots for the best quality paints.
-A neutral background colour (cream or white)
-Painter's tape in various widths
-Paint brushes

Instructions:

1. Paint the canvas with two coats of your white or cream paint.
2. Randomly space your tape to create nice straight stripes in various sizes.
3. After you have taped out the stripes, apply a light coat of your background paint over top of your tape, paying special attention to the seams. This will prevent the paint from bleeding through.
4. Allow the paint to dry fully.
5. Paint stripes in a pattern of your choice.
6. Remove the tape before the paint dries to avoid peeling.

You don't have to be an artist to create simple, custom art pieces for your home...you just have to give this simple technique a try! Let me know if you do!
I'll show you how I used these pieces in my bedroom when I do the reveal later on this week.

Monday, January 31, 2011

Vintage Chair Love!

These past two weekends have been a whirlwind of activity. Last weekend was spent scouting, sourcing and redesigning my bedroom with one of my dearest friends (pics to come later this week) and the weekend before was spent antiquing in Niagara, which totally paid off...S and I found a set of five dining chairs to refinish for $25 each! Needless to say, we were thrilled...They weren't QUITE gorgeous when we found them, but I knew that with a little elbow grease, they would really show their potential.

The set only has one armchair, which is totally fine because we want to get two upholstered chairs for end chairs to go with the table we want (to be revealed later on this week, since S got a night school job, it's totally a "go!")

I decided to refinish the single armchair to use as an occasional chair in our bedroom. It got a few coats of high-gloss black lacquer, and I recovered the cushion with a silk blend and added a bit more padding...Since they say a picture is worth a thousand words, feast your eyes if you will:


Nice "neutral" fabric on the before chair, right? HA!


Done and Done !


Look at the pretty trellis detailing!! It makes me so happy!


Stay tuned later this week for the bedroom reveal! I PROMISE it'll be worth it!

Monday, January 24, 2011

Ode to Spoonflower

Spoonflower is a website that allows members to create their own fabric from any image that can be scanned. Members create fabric from paintings, photographs and photoshop drawings. For my wedding I created fabric out of the paper that I used throughout. The fabric turned out quite lovely, but I didn't end up using it for the day.

Many Spoonflower fabrics are made by independent designers, graphic designers and other industry professionals, but I love the fact that anyone with an image to upload can crank out some custom fabric. Probably the best part about Spoonflower? You can purchase fabrics designed by other members...

Here are a few I've had my eye on:


How delicious would this Cake fabric be in a shabby-chic dining room as a runner, or place mats or even upholstery on some vintage reupholstered chairs...Nothing takes the "stuffy" out of your grandmother's antique dining set like a touch of whimsy!


You know I had to...this Queen Daisy the Boston Terrier fabric is soooo cute! I can imagine it in a little girl's bedroom or on a cute bag.


This Puppachutes and Flying Piggies would be lovely as an accent in a little boy's nursery.


I would love to see this Sterling Rose fabric on some accent chairs or pillows in a grey and butter yellow living room.


The Mustache Gallery is adorable...although I have yet to come up with a practical use for it...perhaps just frame it for a piece that brings a smile.


This Cherry Blossom fabric is a contender for the reupholstered chair to go into our bedroom.

All designs are available in a variety of fabrics (including linen blends and silk crepe de chine) at a variety of price points. Checkout the Spoonflower website for more information.

Friday, January 21, 2011

Bedroom Redux!

Hello-hello!

After a very involved FB discussion about paint colour, S and I decided to go with a colour that is almost IDENTICAL to what we have on the wall...'cuz we're just THAT brave.


The colour is called Wheat Sheaf by Benjamin Moore.

So with that decided, we are off to the races. Here is the inspiration board for the bedroom. The palette is chocolate and pink and cream...

bedroom

We scored some GORGEOUS vintage chairs from the antique store by my parents house. We got five for $125! Considering our first choice costs almost $200 each, I think we did OK. Only one of the chairs has arms, so that one is getting refinished to go in our bedroom. The others are in storage chez mes parents until we have a table.

I'll keep you posted on our progress!!

Monday, January 3, 2011

Welcome 2011

I must admit, I am sad to say goodbye to 2010. With a wedding, honeymoon, new job, lots of new friendships forged and the acquisition of a soda stream, it will be hard to top. I am moving forward into 2011 with the sole resolution to get more organized...luckily for me, an unfortunate NYE accident has rendered me house-bound, so I'll have a lot of time this weekend to put my plans into action. Lots of closets to clean out, and unused items to give away.

As you may know I love to meal plan, I am currently using this lovely scribble menu planner from the lovely, artistic folks over at Ollibird.


I am planning to make it more permanent by printing it onto magnet paper and laminating it, so it can hang out on my fridge.

This lovely alternative option offers a bit more space and more organizational possibilities.


Click here for the link to download these yourself and laminate them or throw them into picture frames to track your own meals. Also, visit Ollibird for more cool downloads (free!) and tutorials. Their Etsy shop Loveland Miscellany by Ollibird is also worth a visit...it has some super-cute, unique and affordable art prints for sale.

Tuesday, December 30, 2008

Just Another Tuesday Night...And My Kitchen!

I have finally decided to bite the bullet and clean up my kitchen for a "photo op." My kitchen is usually quite clean, but it has to be at another level altogether to be blog-worthy...see what I do for the two people who read my ramblings?
Anywho, I decided to make some healthy Bolognese Pasta...and take some pictures in the interim while it cooked. Overall, it was a lovely dinner, if a little rushed (the Leafs are playing tonight, which means everything has to be done by 7:00). I am also procrastinating, because it's about -100 degrees c outside and I have a fifteen minute walk ahead of me. That means I need two things; 1)a beer jacket, and 2)Alpaca socks, scarf, and yellow mittens. I am working on #1 and I have my mom to thank for #2.

Without further ado, here is my makeshift table:


S and I have decided not to get a dining table as of yet...although you KNOW we have at least one in mind. The dishware is vintage, found at a little shop by my house that was owned by the devil...I mean a nice lady...who screwed me out of my Christmas present by "accidentally" selling it to someone else. But I am not bitter...seriously. The shop closed down now. I call that "karma." I made the placemats. I posted about them earlier.


The little white bowls from Pier One have a spicy oil blend that we learned to make from our new favourite Italian restaurant, Grazie (sorry Cafe Amore...). It is a must for bread-dipping.

The view from the front hall. The art is by my very talented grandpa:


My Terrarium in its rightful resting spot:


The Kitchen Aid enamel cast-iron pot on my stove was on sale from $100 to $29 right before we moved. The only thing I regret about that purchase was not buying 10 more. Seriously, it is the only pot I ever want to use. The larger one was on sale earlier this month for a similarly ridiculous price, but now I have to pay rent. Blast this "adulthood."

My sassy microwave, knife rack, and wine rack...fully stocked...I love that one of my best girls is a viticulturist.


I really should go meet my peeps at McMurphy's...they probably think I was held up by terrorists or something.

Tuesday, December 23, 2008

I'm Back, and This is My Living Room

Hi all...

I am finally ready to resume my regular postings. I have been living in the city for almost two months, and I feel quite settled in now. Our space is still a work in progress, but our vintage-modern vision is coming along. When we first moved in we had a TON of cleaning to do (of course), as well as painting and...wallpaper...*shudder

It actually went relatively smoothly, and despite some interesting paint antics in the bathroom, everything came together quickly...That's what months of pre-planning will do for ya.

Without further ado...here is the "before" pic of my living room:


After a lot of consideration, here is how our living room looks today:


I know, right? I am an AWESOME photographer...and there are more photos to come.

The gray chairs are vintage, which we had reupholstered. The couch, which is not clearly visible, was made for us by our reupholsterer. My best advice when designing a new space is not to rule out custom furniture as an option. The couch we had made cost less than the Ikea version we wanted, and we got the dimensions and the fabric we wanted. My point is, you CAN afford custom, and it will last longer, and look more original than the mass-produced versions. Just shop around. You'll be pleasantly surprised.

Tuesday, November 4, 2008

We Have Arrived!

I will be relatively incommunicado for the next few days, as we have moved to the new place, and have no internet or phone hookup as of yet. After Friday I should be up and running again and posting like a madwoman, as we have already done quite a bit of work on the place...The wallpaper is up, and it's basically amazing, the walls in the living room are painted, and all of our pictures have been placed. To complete the living room, I still need a few small picture frames, and some window treatments, but those will have to wait until mid-month.
There is tons of work to be done!

Until Friday!