BannerFans.com

Sunday, October 2, 2011

{Neob Lavender Boutique, Niagara on the Lake}


This summer, S and I had the pleasure of visiting the Neob Lavender Farm in Niagara on the Lake. This beautiful establishment is home to several different types of lavender, as well as a boutique, a state-of-the-art glass to glass distillery to make essential oils, and several other plant families. The husband and wife team who own this farm/boutique also distill their own essential oils. They took us on a tour of the facilities, and I learned so much about lavender and the process of making essential oils...It takes a staggering amount of plant matter to make even a drop of essential oil...It's no wonder that genuine essentials are so expensive!


This place has been a favourite of my mother's for years, and she was so excited to share it with me. It was just so beautiful, and the intoxicating, omnipresent scent of lavender reminded me so much of the south of France...It really is a lovely way to spend a sunny afternoon. Don't forget to pick up a lavender plant to add to your garden. I'm vacillating between pink lavender and French lavender...decisions, decisions!


Goodbye 'till next year, Lavender Farm!

Tuesday, September 27, 2011

My Return to Blogging is Imminent!!

Between getting the house up to par, vacationing, returning to work and just generally living it up, I haven't been able to find the time to blog as often as I'd like. My goal for October is to return to some semblance of regular bloggy-existence. I have so many pictures to share, not to mention recipes and fun ideas...We will be together again soon, I promise!

Wednesday, May 25, 2011

{Stencils: Love 'Em!}

It's no secret that I love the hell out of wallpaper...but it's also no secret that wallpaper can cost a pretty penny (over $300/ roll at Farrow and Ball). As of late, I've seen designers doing amazing things with stencils, and I thought I'd share some of my favourites. Now, if the word "stencil" has you shuddering, with visions of Jemima Puddle Ducks and grape leaves flashing hideously in your mind, fear not! These new stencils will certainly impress.

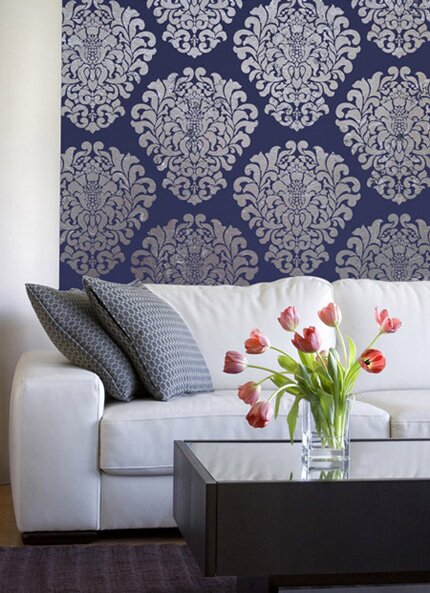
One of the best sources for stencils has to be Royal Design Studio. I can hardly believe these are actually stencils...they look so perfect!


I am also loving the idea of using these unconventionally to inject a little more detail in unexpected places.


What an awesome way to give new life a vintage piece of furniture. This would work well on bathroom cupboards and armoires as well!


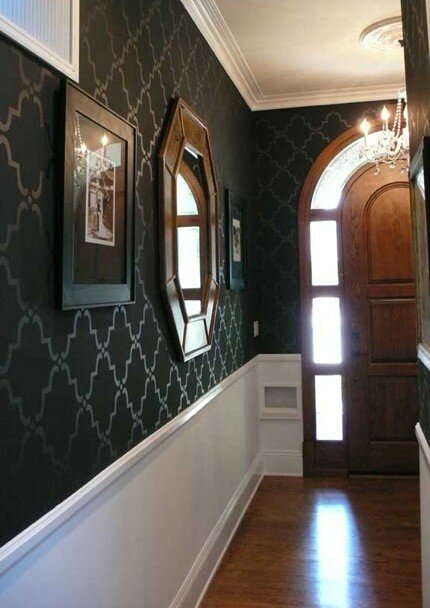
I love this Moroccan trellis pattern so much! What a perfect way to add richness and detail to the space. I think the effect would be equally effective below the chair rail in the right circumstances.


A stenciled design would freshen up any concrete floor. I think it would look right at home in a solarium, on a covered concrete patio or in a basement.

What about experimenting with a stencil design as a piece of art?


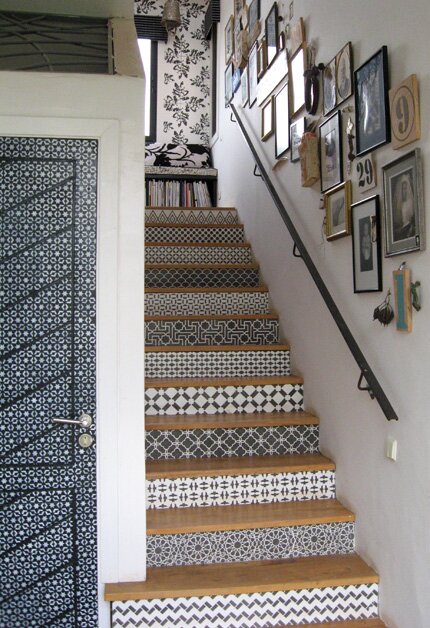
I absolutely ADORE the use of stencils here to add interest to the rise of these stairs. They look gorgeous!

As everyone knows the worst thing about wallpaper is trying to remove it after it's been up for years. The best part about these stencils? When you're sick of them, you just paint over them. Easy peasy!

On a side note, Steve and I are going to see a house in the West end tomorrow that we're VERY excited about. Wish us luck! I'll let you know how it goes!

Tuesday, May 24, 2011

{We are officially House Hunters}


Note: Not in our budget

Well, friends it`s official. S and I are finally in the market to purchase our first home. We are fairly bursting with excitement to own our own piece of the city we love so much. We are currently looking in two very distinct 'hoods (read: the only two we can afford in Toronto...this city is NOT cheap) one is in the East and the other is in the West. We have ties in both areas, and although S and I both work East, getting from A to B is a relatively easy task. I am presently pulling for the Easterly neighborhood, but S isn't set on either in particular.

As many of you know, I am a researcher. I have been following the Toronto real estate market closely for about two years now...There are three things I know about this market for sure;
  1. There are not a lot of homes for sale
  2. There are many people who want to buy houses
  3. There is no "good time" or "bad time" to buy in T.O...it's always buying season here, and you need to act fast
With these things in mind, it's easy to see why a buyer absolutely HAS to be savvy when trying to procure a piece of real estate...Basically when you see the house you want, you make an offer semi-immediately and over-asking for good measure. Think Southern California circa 2006, lite of course.

So we begin our house-buying (and hopefully renovating) adventures. We are currently in "education mode," which essentially involves going to countless open-houses until we are comfortable enough to make an offer on a house on the spot. We will definitely keep you updated in terms of progress as we navigate these waters.

In terms of what we are looking for, we have lists (yes, listS haha!) Let's begin with the "Must -Haves," shall we?

Must Have:
  • Structurally sound
  • Freehold ownership (NO condo)
  • Minimum semi-detached
  • Forced air/HVAC system
  • 2+ bedrooms
  • 2+ bath
  • Character
  • Parking
  • Yard
  • Good schools in the area
Ideally:
  • Not renovated
  • Fully detached
  • Garage
  • Central air
  • New windows
  • New wiring
As you can clearly see, our lists are neither extensive nor overtly specific. We know to overlook decor and furniture when house hunting...that's just good common sense.
You may think we're crazy for wanting an unrenovated home, but here in the T-Dizzle the trend appears to have been "buy a house, go to Home Depot, buy a bunch of crap for $200-$300 and put it up as quickly as possible while doing as much invisible damage as possible, then sell it for 50k more because it's RENOVATED!!!!!" Ugh! The LAST thing we want to deal with is some crazy DIY-er's hideous mess **aaaaaaand breathe, Alanna**

So, let the wild rumpus begin! Of course, we'll keep you posted!

Monday, May 23, 2011

Che Sera, Sera...

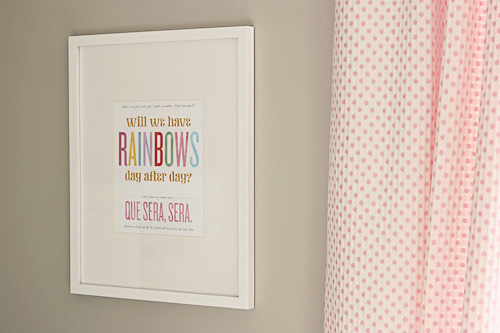
One of my favourite bloggers, Nicole from Making it Lovely has generously created this gorgeous printable art. How CUTE would it be in a playroom, or a little girl's bedroom? I love it!


Print it out on some heavy card stock and frame it up in a simple white frame for a beautiful effect. Here's how it looks in her daughter's bedroom:


Download your own here and enjoy!

You've Got Supper!

I am a religious meal planner. I openly admit that I love flipping through my recipe books on Saturday afternoon and planning my meals and grocery lists for Sunday. I fully realize this may mean that I have a problem, and that most people do not derive pleasure from activities like this...for those people may I recommend "You've Got Supper."


This fabulous, FREE service creates weekly meal plans and grocery lists for members delivered each Thursday. If you prefer to create your own meal plan, you can choose from delectable options for all meals of the day such as Seared Steaks with Balsamic Glaze, Creamy Dreamy Mac and Cheese and Pumpkin Doughnut Muffins.

The grocery lists are great because they are categorized for easy shopping:

I really, really love this service and I am loving all of the delicious and healthy new recipes. It's good incentive to cook at home and save some moolah.

Check it out, you won't regret it!

Tuesday, May 17, 2011

Adventures in Macaronage!

Did I just do a happy dance in my kitchen? Maybe...YES!!!!!
Ladies and gentlemen, I can now cross one of my major life accomplishments off my list...here it goes! Make Perfect Macarons. How did I do it, you ask? Not without abysmal failure.
Follow along with my adventures in macaronage...who knows, you may even learn some tips along the way! (NB: "macaronage" is defined as the art of making macarons)

For the recipe, I mildly adapted this one by Chef Chuck Hughes

You will need:
  • 2 cups almond powder (500 ml)
  • 2 cups icing sugar (500 ml)
  • 4 egg whites, room temperature
  • 1 cup sugar (250 ml)
  • 1 cup water (250 ml)
  • pink gel food colouring
  • raspberry jam for filling
Process:
  • In the food processor, mix the almond powder and icing sugar together until it’s reduced into a very fine powder, for about 2 minutes. Add 2 egg whites and process until smooth (the texture will be similar to almond paste). Add the food coloring and continue processing until the color is all blended in. You can add a few more drops just until you get the color you want. Transfer to a large bowl and put aside.
  • In a stockpot, bring the 1 cup water and 1 cup sugar to a boil and cook for about 15 minutes, until reduced by half and syrup is coating the back of a spoon when dropped in cold water or until a candy thermometer reads 275*.
  • Using a stand or hand mixer, beat 2 egg whites until soft peaks form. Slowly add the hot syrup and continue beating until firm peaks form and the meringue has cooled.

  • With a spatula, gently fold in 1/4 of the meringue into the almond mixture. Continue folding the meringue until completely incorporated. The mixture will be shiny and smooth.

  • Fit a piping bag with a 3/8-inch (1 cm) round tip. Pipe the batter onto the baking sheets. Tap the underside of the baking sheet to remove air bubbles. Let dry at room temperature for 1/2 hour to allow skins to form.
  • Bake the macarons in a 300F oven for 20 minutes ON A DOUBLE BAKING SHEET (stack them for thickness to avoid cracking). Rotate the baking sheet half way through for even baking. Remove from oven and transfer parchment to a cooling rack.
  • Pair macarons of similar size and spread approx 1/2 tsp of jam on each all the way to the edges.
  • Allow to rest for 1 day to meld flavours...YEAH, RIGHT!
My tips for perfect macarons:
  1. Do let them rest after piping for 30 minutes.
  2. Double up on the baking pans to avoid cracking.
Some recipes say these steps are unnecessary. You tell me:

Monday, May 16, 2011

Bunting Love!

Admittedly this post is probably about two years late, but can I just say that I adore these little pennant buntings that seem to be popping up everywhere? As the weather warms up and S and I begin the process of shopping for our first *family* home together, I have visions of outdoor tea parties and backyard barbecues adorned with these little pretties...Not to mention nurseries, children's birthday parties, weddings...not that I'm getting ahead of myself. I'd never do a thing like that ;)


This bunting from Mon Petit Amour is just adorable on display in a little girl's room.


Buntings like this one from Joy's Hope are available all over my favourite place to shop: Etsy


This bunting from Design Sponge would be a cinch to make, and it looks perfect. What a great way to decorate a cake if you lack icing skills (as I do)!


Imagine adorning a lovely layer cake with a bunting like this one made of stamps available at d.Sharp. What a great way to reuse post marked stamps. I was basically obsessed with the process of soaking stamps off of envelopes as a child...find out how here.


This picture is one of an Alice in Wonderland-inspired series taken by Rileigh ofBlue Satin Sashes. Coincidently, it's one of my favourite blogs ;)


Find a tutorial for this bunting-adorned pendant at You Had Me at Bonjour. It's a cute way to incorporate a bunting in a different way. It's a neat idea for a "custom light fixture" on the cheap!

Saturday, May 14, 2011

Les Macarons


I am, at present, obsessed with macarons. These slightly sweet, crunchy/chewy cookies are delicious but more importantly, they are simply beautiful. I think these cookies will one day eclipse the current cupcake craze...read: hope.

Several bakeries in my area make delicious iterations (read more about that here), and last weekend S and I found some amazing flavours at La Bamboche bakery. I was especially excited to try the salted caramel, but alas it was sold out...I guess I'll simply have to go again :) We opted instead for the Creme de Cassis, Lavender and Amaretto flavours...Oh.my.word. So delicious!


I HAVE to learn how to make these. You know I've been researching like a mad woman, and I think next week sometime I will take my first stab at them.


This is the best video that I have found on the process (warning: it is in French...You can just watch what she's doing if you don't understand...she's just describing the process)


Ooooh! This makes me even more excited about my upcoming France trip...I anticipate LOTS of time spent at Ladurée!

Wednesday, May 4, 2011

Happy Birthday, Beautiful!


Happy birthday to a lady who truly defined grace and elegance for generations of women.

Thursday, April 28, 2011

What to do...

Monday, April 25, 2011

Ah, Oui! C'est Printemps!

Finally, winter has melted and the sun is smiling warmly. Spring weather calls for long runs outside, picnics in the park and dining and drinking al fresco. I, for one, can't wait! Lately I've been feeling light and energized...On those first sunny days of the year my body feels like it's absorbed all 980 trillion kw of the energy emitted daily by the sun. I think I am so lucky to live in a part of the world with four distinct seasons. Each one is a welcome change when it comes around.

When I think of spring and summer, I think of balloons...I'm not sure why, although I'd hazard to guess it has something to do with the fact that balloons are something one usually sees on a sunny day.


Source Unknown


Enjoy this fine weather in good health and comfort knowing that there's plenty more to come!

Wednesday, April 20, 2011

Wedding Wednesday

Rustic Vintage Wedding...for no one in particular...

Monday, April 18, 2011

Chocolate Cherry Coconut Larabar Recipe...

My husband has been referring to me as "Pete Schweddy" this evening on account of my delicious, chocolate balls...But joking aside, of the 16 I made, zero remain. This is HUGE praise from S, as his reaction is usually lukewarm to sweets (he much prefers salty snacks).

Many of you have probably had a Larabar or two by now. These bars are delicious...but they hurt...deep in the pocketbook. At as much as $3 a pop, I can afford to eat about 1/2 a Larabar a month, which is simply not enough. This had me scouring their website in an effort to make a version of my very own. The Cherry Pie flavour seemed to speak to me, but then so did the Chocolate Coconut Chew...uh oh! A dilemma! Naturally I decided to try to make both...in one.

I know the basic Larabar principle is equal-ish parts of all ingredients. I watched a few Youtube versions and then I was on my way.

Here's what I came up with:


Ingredients:
-1 cup pitted dates, chopped (be sure to purchase pitted...sadly I overlooked this detail)
-1 cup dried, unsweetened cherries, roughly chopped
-1 cup raw almonds, chopped
-2 tbsp + 2 tsp cocoa or carob powder (unsweetened)
-1/2 cup shredded, unsweetened coconut
-1-2 tsp cinnamon (optional...I didn't use as I forgot)

Directions
-In a food processor, process pitted dates and dried cherries together into a paste. I added 1-2 tbsp of water to loosen the consistency...you could also use any oil you have on hand.
-Put processed dates and cherries into a medium-sized bowl.
-In the same bowl of the food processor (no need to wash...it's all going to mix together in the end) pulse the almonds until they are very finely chopped. Some of mine were almost a flour consistency while the rest were slightly more chunky. It's good to have a variation in texture, but don't process for too long, or you'll wind up with almond butter...not that that's a bad thing ;)
-Put the almonds, cocoa and coconut into the same bowl as the dates and knead until well combined. Tip: Wet hands make the dough easier to work with.
-Shape into bars or, as I did, balls. Use about 1/4 cup of the mixture for the bars and about 2 tbsp for the balls. You could even roll them in coconut or cocoa to finish.

I chose to roll the ingredients into balls after trying the little bouchées at one of my favourite raw, vegan, macrobiotic restaurants Kale Eatery. If you're ever in my 'hood...and you're into that kind of thing, give it a go. It's really, really good!

Enjoy!

Tuesday, April 12, 2011

Paris, je viens!!


It's official!! SB and I have booked the trip!! Two weeks in Paris and a week in Nice, with side trips to Monte Carlo, Monaco and wherever else the wind takes us....All I can say is "eeeeeeeeeeeeeee!!!!!!"

We rented this cute little apart-hotel for the first two weeks. It has a kitchen, so I can bring yet another one of my life goals to fruition: cook an authentic French meal in France...


...and we booked this hotel in Nice...It's allegedly RIGHT in the middle of downtown.


All I can think of is this trip...which is not good given that I have several other responsibilities to attend to between now and August...including renewing passports and officially changing my name...Oh yeah, and teaching the babies, too!

Le sigh...Happy sigh!

Saturday, April 9, 2011

Has it been so long? Updates!

Well, I suppose since I've been neglecting my little blog, I owe it an apology. It's always on my mind, but I haven't been up to making the time...Primarily since I've joined Swap-Bot this adorable online community of snail-mail lovers sends each other trinkets, teas, candies and crafts through the post. I am, at present, obsessed! Additionally occupying my mind is our upcoming three week France vacation! I am positively vibrating with excitement!! We're renting a little Paris apartment for two weeks, then spending a week in Nice, exploring the French Riviera. I absolutely can't wait to really immerse myself in the French culture, language and food.
A few weeks ago (more like 8, ha!), Steve and I saw the Canadian Opera Company's production of The Magic Flute. It was a dream-come-true for me to see this particular opera live, as I have been listening to it since I was a little girl. Needless to say, I was reduced to tears on more than one occasion. If you have the opportunity to see it, I strongly, highly recommend.
The time has come for spring cleaning, so I must aweigh to continue with that most arduous of tasks...but since I'll be following the checklists outlined here, it should be relatively pain-free.


The tools of my trade for the day...Ready, set, go!

Wednesday, February 2, 2011

Dining Room To Be...

I basically have my entire future house planned out in my mind, which all of my home-owner/home shopping friends have told me can lead to nothing but disappointment...But honestly? I can't help myself! I see gorgeous pieces and I instinctively imagine how they would look in their "ideal setting" (aka my house...Natch.)

This board is a very rough sketch of what I have bouncing around in my head with regards to my future dining room...


The Breakdown:

The wall colour is Coventry Grey by Benjamin Moore. We have this colour in our present space, and I absolutely adore it...so I think I'll stick with the tried and true in this case.

The wallpaper here is from Target, and it's been discontinued...it's not ideal anyways. I am sure we'll wind up with wallpaper from Romo Designs. I just can't get enough of them!

The gorgeous Edison Chandelier from the Pottery Barn is a true show-stopper. I love it's Industrial Chic-vibe...a little nod to my husband's engineering roots.

The grey upholstered Cody Chairs from West Elm will sit at either end of the table to balance the vintage chairs we purchased mid-month, which I will be reupholstering (in the same-ish fabric as the Cody chair) and spraying (cream or white...) when I have spare moment.

The Angle Leg Table is in the cards for the next couple of weeks. It's expandable with self-contained leaves. It's the perfect piece to really grow with us. Our initial idea was to go Ikea and just trash it when we buy, but why waste $200+?

The drapes shown here are Pottery Barn velvet blinds, but I'd definitely go with the Thai Silk drapery from Restoration Hardware if we were talking our forever home.

The Madison Distressed Convex Mirror from Restoration Hardware makes my heart happy...but the $675 price tag leaves me with visions of a diy tutorial to come.

I already own the Glamour Clock and it's one of my favourite pieces. I think it would fit perfectly in my dining room for a bit of sparkle and polish.

Well...I guess I'll just continue to patiently wait for "Snowmageddon"...here`s hoping for a snow day tomorrow!

Tuesday, February 1, 2011

Easy-Peasy Art Project...


This art project is perfect for pulling a room together. It's inexpensive, AND it's easy...double bonus!!

All you need to complete this project is:

-Two canvases in the size of your choice
-Three or four paint colours that coordinate with your space (try picking from a fabric or bedspread in the space for a super-easy palette...you can also "layer" colours for more depth by picking different shades in the same family) Buy $3 test pots for the best quality paints.
-A neutral background colour (cream or white)
-Painter's tape in various widths
-Paint brushes

Instructions:

1. Paint the canvas with two coats of your white or cream paint.
2. Randomly space your tape to create nice straight stripes in various sizes.
3. After you have taped out the stripes, apply a light coat of your background paint over top of your tape, paying special attention to the seams. This will prevent the paint from bleeding through.
4. Allow the paint to dry fully.
5. Paint stripes in a pattern of your choice.
6. Remove the tape before the paint dries to avoid peeling.

You don't have to be an artist to create simple, custom art pieces for your home...you just have to give this simple technique a try! Let me know if you do!
I'll show you how I used these pieces in my bedroom when I do the reveal later on this week.

Monday, January 31, 2011

Vintage Chair Love!

These past two weekends have been a whirlwind of activity. Last weekend was spent scouting, sourcing and redesigning my bedroom with one of my dearest friends (pics to come later this week) and the weekend before was spent antiquing in Niagara, which totally paid off...S and I found a set of five dining chairs to refinish for $25 each! Needless to say, we were thrilled...They weren't QUITE gorgeous when we found them, but I knew that with a little elbow grease, they would really show their potential.

The set only has one armchair, which is totally fine because we want to get two upholstered chairs for end chairs to go with the table we want (to be revealed later on this week, since S got a night school job, it's totally a "go!")

I decided to refinish the single armchair to use as an occasional chair in our bedroom. It got a few coats of high-gloss black lacquer, and I recovered the cushion with a silk blend and added a bit more padding...Since they say a picture is worth a thousand words, feast your eyes if you will:


Nice "neutral" fabric on the before chair, right? HA!


Done and Done !


Look at the pretty trellis detailing!! It makes me so happy!


Stay tuned later this week for the bedroom reveal! I PROMISE it'll be worth it!